Saturday, May 30, 2009

Random : Bee & Din's KE70.

Project halted! No mood to continue the project. No money. Everything had been assemble back and its time to bungkus the car. Anyway, I remove the flare coz the Watanabe's offset is +10. Beaten fender? I dont care. As long as it is Watanabe. :P

New guest in da house. Din's KE70. Was suppose to use the car for Bagan Lalang trip, but my parents didnt give the permission to go. So, the car was only for display in front of the house. Sigh. Really love the car. Bassy exhaust, driftable, light and nimble, very responsive and so on. Why lah I didnt bought it in the first place? 10x much better and worthwile compare to Bee. Hmhm.

Monday, May 25, 2009

DIY : My Dream Wheels! Part 2.

Yes, its done! Restoration of the rims had finished and this is the results. Cant wait to fit it on Bee.

High temp spray can and clear coat finishing. I was using all the balance that I had in store.

Taraa.. Will AutoSol it one more time soon~

Sunday, May 24, 2009

DIY : My Dream Wheels!

I saw this rims few years ago and I had kept in my heart that one day I will buy this rims no matter what. And today, despite my car desperately need a body work, I bought the rims. Of course whenever unexpected purchase occurred, there's always Mok as a financial backup. Thanks my dear.

:D

Anyway, what is it? Its the banana rims or the real name is RS Watanabe. Its always had been my dream rims. So whats the big deal? Well, it might not a big thing for you, but it does to me. Hehehe. Only 1pair, but I think it will look much better compare to my current rims. Will put it in front soon. 13 inch, 6.5jj and uknown offsets. Told ya, its common.

My traditional routine whenever I buy a new rims :

Its here~ Anyway, it belongs to Mok, not me.

Was trying my best to clean up the rims.
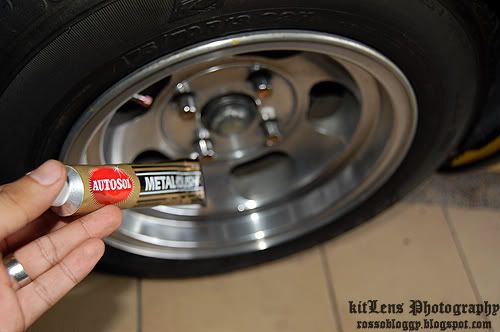
Then dried it up. Again, Im using AutoSol to shine the lips.

Tape up the lips so that I can paint the center tomorrow.

I feel great today! XD

Saturday, May 23, 2009

Story : OK, I'll Do It!

More updates:

The rust..

Close up. There is more below it.. Trust me.

Rear had been painted with black anti rust paint. Im thinking of not putting the rear seat back.

Clearer picture of the RX7 immitation seat installed. Fits like a glove.

And finally. the new old school Mazda horn button to complete the Mazda collection in the car.

Purist I am? Noooo.. Hehehe. Anyway, I think I will just repair the whole firewall only.. That will cost me around RM1k I think. The holes on the floor? Lets just leave it just like that till the day where I have extra cash to spend on it. Sigh, there goes my engine budget.

Monday, May 18, 2009

Shop Visit : Bucket Seat.

Today, I went to Jeembo's Garage to fit in the bucket seat to replace the uncle leather seat. Hahaha. Well, Im glad there's less problem during the fitting. So here's some pics!

Wuu, messy interior as I didnt put everything back to its place yet.

Railing transfer process.

Done! Ngam despite the seat is suppose to be on the passenger side and its feels good during cornering. Drawback? Very hugging, kinda difficult to get in and out of the car, less room for elbow coz very close to the door and offset steering.. Huhu.

Thursday, May 14, 2009

DIY : Stripper Project. Day 2.

Day 2 stripping project. My special guest of the day is Mok! Like it or not, she was helping me stripping the car; whole day! Hahaha. Lets see Mok in action.


Another shot. Trust me, its not an easy job to remove the sound deadening.


Done! Was kinda rushing coz today Im driving to Johore Bahru.


More dark secret revealed! More holes from driver side.


And big holes from passenger's side.


So, the car will be left for a while as Im collecting some budget to repair the whole floor and others. Its either will be left for a long time, or if my 'business' is running good, it might be a whole makeover for the car. God knows.

Good night folks!

Tuesday, May 12, 2009

DIY : Stripper Project. Muahahaha.

Stripping project started today! Waited for Jaguh to came around 2pm. Mok also came to help me and visiting her future mother in law~ Hahaha. So, lets get started:

My house will be messy for a few days. Sooo many unused parts in the dashboard will be in the box.


Moment of truth. Rear floor, no rust! Good.


Front? Well, looks good. Lets search deeper!


Sound deadening removal process.


After a while. Wire brush + manual way. Secret revealed!


While we were doing the floor, Mok did this with some help from AutoSol.


Dashboard had been removed. Dusty, messy, and a lot of unused parts. We will remove some parts to save a few kilos in the car.


Kinda dissapointed when I saw these holes that hide behind a carpet all this time.


The main culprit of the rust? Aircond panel. Yay~ Rain water was channeled inside the car through this hole. Need to seal this holes too.


Dashboard beam that need treatment too. Sigh.. Main problems of old Mazda; rusty firewall and aircond panel. Just like Megat of PlayHouse told me earlier.


Will continue the sound deadening removal tomorrow and maybe anti rust coat on Thursday maybe? Holes? I will send it to Play House Garage for a treatment. Anyway, thanks to Jaguh and Mok for helping me today. You guys are the best!