Monday, June 29, 2009

Random : Customized Mazda Emblem.

To Mr Jaguh, I want this! I want it! I want it! I want I want I want I want!

And here's my emblem. Any idea how to customize it oh Mr Jaguh? Can custom aa? I really have no guts to cut em up coz this is a rare stuffs.

DIY : Gauges and Radiator Shrout.

It's been awhile since my last update coz I dont have any mood on updating the latest project. Hehehe. Sigh, Im returning to UTM next week and Im not ready for the new semester. I want to stay at home and do more project on Bee. Huhuhu. Anyway, the Autobot stickers and Mazdaspeed wannabe sticker. Wee.

Already stick the Mazdaspeed sticker but I still cant decide where should I place the Autobot logo. Any idea?

While Mok was designing the gauges board, my roomate came for a sticker job. He just painted his car and interested with the Mini theme. So why not? At least I gain more experience on sticker job. Measuring and marking time.

End results! Looks good from far. Har har har.

Then there's Mr Jaguh Autoworks in action. Seriously if you asked me, wiring job is the hardest coz I cant imagine the wiring logic. LOL~ I failed my electric subject anyway.

My aircond fan that had not been working since my aircond motor gone. So, I asked Jaguh to do some wiring so that I can make it working for some extra air suction as an aid for the radiator fan. And luckily, I got one unused switch on the dashboard.

OEM with the dashboard. I wonder what is the original use of the switch?

The custom panel by Mok. Unfortunetaly the license plate is really weak and it broke into two after 1 gauge hole was made. So I will buy an advertising plastic board as it is much easier to work on,much lighter and reliable.

As for the radiator shrout, it was cut into two as the fan is big and the distributor are really close to the radiator. The shrout was meant for Vannete C22/ A15 engine, and my radiator luckily is from the A15 engine also. Previous owner love to mix and match I think.

The top shrout fits like a glove. LOL. As for the rear, Jaguh cut it into another half and only fit the right side only. So now Bee has a much better cooling system. Two working fan, one can be controlled from the inside, another one is direct (Im thinking of switching to a clutch fan soon), a shrout to channel the air, and I hope it works.

And I bought an Autogauge for the RPM. Unfortunetaly again, it is malfunctioning and it is not accurate at all, so I will exchange it tomorrow for a Jasma one.

My pet, Bujur (Oval) was sleeping on the couch while Im updating this post. Manage to woke him up with the flash. Gosh, this little creature is very cute.

Wednesday, June 24, 2009

Info : Bee's Background.

Just a few infos from the internet. Need to do some research coz Bee's engine is not 1.3, its 1.4. So more questions were popped. What is the engine code? From what car? So, first I checked the grant and found out the engine code is UC.

From what I found on the Wikipedia:

The 1973 Familia Preso featured a 1272 cc engine. It was sold as the Mazda 808 in some export markets such as New Zealand and Australia and Asia Pacific markets and Mazda 818 in many others (presumably due to the usage of numbers with a middle zero by Peugeot for its automotive models). In Japan this model is also known as the Mazda Grand Familia and its top line model is a 2 door coupé with twin round headlamp and a rotary powered engine known as the RX-3.

This generation was available in coupé, sedan, and station wagon forms. Engines were inline 4 cylinders and included a 1272 cc, a 1490 cc, and a 1586 cc option.

Engines:

  • 1973-1976 - 987 cc I4, 50 hp (37 kW)/56 ft·lbf (77 N·m)
  • 1970-1973 - 1.3 L (1272 cc) TC I4, 2 barrel, 69 hp (51 kW)/67 ft·lbf (92 N·m)
  • 1973-1976 - 1.6 L (1586 cc) I4, 80 hp (60 kW)/91 ft·lbf (124 N·m)

Malaysian version of 808 should be running on a 1.3L engine with the TC engine code. Unless yours is a Mazda RX3, then it will be a rotary 12A inside.

And from Wikipedia, it is known that the UC series are:
  • 1.4 L (1416 cc, 86 cu in) (77x76 mm) - A larger-bored version of the TC, used in the 1978-1980 Mazda GLC. Produced 70 hp (52 kW). Was also used in the E1400 Bongo van and the 1984-87 Ford Econovan. Has been mistakenly called a D4 engine in some documentations and parts catalogues.
So, problem solved! The previous owner had swapped the original engine with a Ford Econovan/ Mazda Bongo's engine. I hope most of the spare part shop still have the overhaul set for the engine. Should I overhaul now or wait first? Hehehehe. I love my money. Kekekeke.

Random : Transformers 2 : Revenge of the Fallen.

"Fuwahh!" is the only words that came out when we (Mok & me) arrived at the cinema area. Guess what, the cinema is full on a working day! All Transformers show from 10am till 12am was sold out! Of course we tried to get in the queue and thought of buying a ticket for tomorrow's show and we were lucky coz there's one couple seat left for today's so we took it. Hahaha. My luck I guess.

My score for the movie? 11/10! Yes, no doubt it is the BEST movie ever made and it is worth more than RM10 per movie. We will be watching it again on Imax, in a 3D version. Just go and watch it for yourself, it is really worth watchin it and full of action in 2hours plus. Awesome, awesome. That's all I can say when Im in the cinema.

Go watch it! Go! And please dont buy the pirates DVD, you wont get thrilled and enjoyed it coz there's a lot of animation and I can bet you the DVD version will failed you.

Some goodies from the cinema and Petronas. This will go to my collection vault. Hehehe.

The car was prepared just for the movie! Flare back on, new rims, and 3piston symptoms is back! More sign to do overhaul.

Bumble Bee in the movie is very funny and emo. I guess mine is same. Kekekeke. 3piston running also still went to the Jusco for the movie.

The butt. I wish the car is in good condition. Another 3-5years perhaps.

Mok is back! Wee. She came from JB just for the movie. Thank you dear for coming.

Monday, June 22, 2009

Video : Fooling Around.

Met with a frends, Bakat (Gifted) and Ejat Trashed of Kelab Kereta Lama to have my carbie tuned. Bee had been coughing a few days ago. So, after a few try and error, its time to try the car.

Videos by Ejat Trashed. Thanks dude!

Testing the Bee. Not so fast though. And manage to get it sideways.


And they asked me to test Ejat's KE70.


Uhh, I miss drifting. Sigh.

Random : More New Toys.

This week's project is ready to go! Main project is the DIY gauges panel. Here's some materials, a drawing board, an empty plate number, gauges, and etc as shown.

Some rough sketches on the drawing board. Old school vacuum meter is fitted here.

New replacement flare from PlayHouse Garage. They accidentally gave me a pair of right fenders only, so they gladly replaced it. Good attitude seller and the fenders have been sanded. Why? Will fit it back becoz..

Just got myself a pair of Wedsports! 13' only with 7jj and -1 offset. Hehehe. 7jj is the reason I took it.

And a bee figure. LOL~ Will remove the spring and replace with a mounting cup and rope. Where should I place it?

Sunday, June 21, 2009

Shop Visit : Exhaust Shop.

Bee sounds too loud this few days, so we decided to visit a nearby exhaust shop which is known for its cheapness and quality. So, up up she goes.


Main problem? Rusty center bullet. I guess its life ends today. RIP; 1977 - 2009.

Solution? Cut em up and there goes a straight pipe! And since we were already at a exhaust shop, why not try it? Try what? Check this out.

Taraa. A bend exhaust tip. I know it do looks fuckin weird from this angle due to its angle. Will make a new piping soon so that the tip will be 90degree from the body.

But from this angle, it does looks good. And I think Jaguh also wanna do the bent exhaust tips. Why not? Right?
The shop? Wei Yip. I guess most of us in KL might now this shop. They have a few branch but we went to the Balakong area. The manager in charge is very friendly. To custom the tip, it tooks him 5-6times and almost 30minutes altering the tip's angle and to have a customer like me usually it means more details needed and yes, they are good at it. They will do it until we are satisfied. And I recommend this shop to you! Plus one for the shop. We will be coming again soon.

Some vids, I asked the manager start the engine. Fuah, damn loud and beng! Straight pipe yo~


And the new exhaust's note. I guess it is too loud. Had tested it and I think I need a center bullet back! LOL~


Sorry for the lame vids! Hahaha. Coming up next week : DIY center panel with a few gauges and switches I think.

Thursday, June 18, 2009

For Sale : 13' Watanabe.

Brand : Watanabe.
Model : Pisang / Banana.
PCD : 114.
Front size : 13'
Front offset : +10 x 6.5jj.
Rear size : -
Rear offset : -
Tyres : No tyres.

Rim units : ONLY 2 UNITS / 1 PAIR.

Price : RM 600 Highly Nego.
H/p number : 012 72 3345 4 / Amar.
Location : Prefer to be in KL area but I can post if you want.
Payment method : Prefer COD.

Others :
*Although this is my favorite rims, I need to sell the rims coz my engine's is about to gone. Need funds to overhaul / replace new engine.
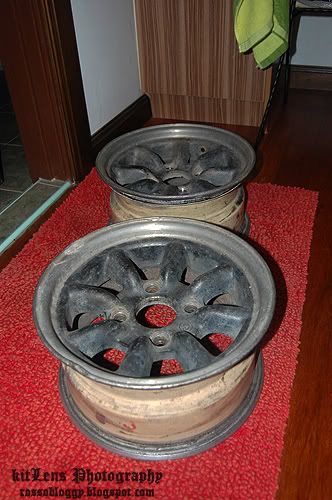
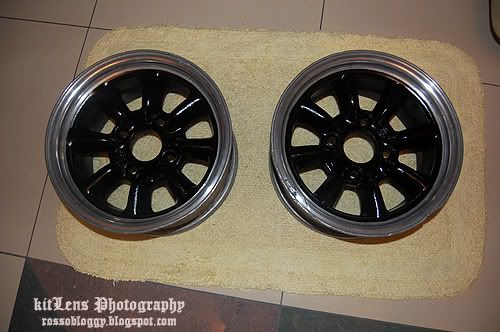
*The rims had been refurbished by me. DIY.

Pictures:
BEFORE:


AFTER:


Can view the restoration process at this link.
http://retrosyndicate.freeforums.org/1978-amar-s-808-t2468-165.html

Thank you.

Photography : Testing Strobes & Nikon D80.

Asu was kind enough to lend me his camera and tools. And I got the opportunities to learn more about external flash and the experience of using a Nikon D80, which is 10x more better than my current D40, and also the long lens that he's using.

So, here's some. We'll be going for a photoshoot this Sunday. Along with Asu and another talented photographer, Rev. Who's car? Bee and Jaguh's KEtam.

A few hints how good Asu's gear:


Only a set of flash really does this. Amazing.

Nice eh?

Will wait for more photos from him. I only copied a few of em.

DIY : Tail Lamp Restoration Project. Done!

Yep, the last part of the project. It is time consuming, but you can see the results now. And coincidentally, there are a few friends came to my house today for a visit. We'll go through later. And here is the tail lamp that I'd restored with so much love and care. LOL~


And who else to rely if not on Mr Jaguh, the big boss. Gosh, I wish everyone I knew is like him. Dash fitting process. Also time consuming coz troubleshooting the board circuit.

And the special guests of the day were, Asuramaru from Kelantan! He called me whether Im free or not, so I said we were fitting the tail lamp, so he said he'll come, and I pick him up at the nearby train station. He's the photographer of the day today.

And the other one is Afiq. One of my blog reader. Kelantanese also. Everyone came to see Jaguh in action. Kekekeke.

While Jaguh was fitting the meters, we were assembling back the tailies. Here's Asu in action. He's friendly and easy to get along with.

Then, Jaguh the expert was doing the wiring.

Done! Here's the new Bee. Oh, the emblem is too bulky so we decided not to fit it in.

And the new tailies. I guess I made a right desicion buyin it. Looks more 'muscle' now. Time to focus on a good wheels! Next! =P

Check out the next thread!

Tuesday, June 16, 2009

DIY : Tail Lamp Restoration Project. Part 2.

Yep, second day of the DIY project. Woke up late at 1pm and while taking bath, I took the oppurtunity to sand the surface so that old paint, dirt and all kind of other shit will be washed away. Dried it up and it is ready to be painted.

Thank God today's weather is sunny. Im using a flat black can spray and for a gloss finish I used the clear coat so that it will be scratch resistant.

While waiting for it to dried up, I went to have my lunch and polishing the lens, and also AutoSol-ing the emblem one more time.

Taraa. Bee's has a black eye now. Dunno who had punched her in the eye. LOL.

Since everything had dried up, I went back to my room and its fitting time. Put the lens all back to the cover.

To seal the lens from outside moist, I used the silicone. Its kinda hard to make it perfect but dont worry if you had screwed it up. Once the silicone had dried, it becomes a rubber seal. You can just simply pull it.

Some final touch up. Paint marker to do a 'fake' chrome lining as most of the chrome lining had already fade and no hope to be restored. This is the hardest part. It is time consuming.

After three hours, this is the results. Of course I do made some mistakes, but its normal for a human to do it. For a safety measure, spray a few clear coat layer so that the fake chrome will not fade.

Assembled everything back together and it is now ready to be fitted onto Bee! Anyway, which one should I use? Hmmm.

Have fun trying!